Materials Needed
Before starting construction, prepare the following materials:

Basic paddling pool
A regular children's paddling pool, which serves as the main foundation of the pond.

Poposoap kit
Waterfall components, fountains, and their supporting parts. The fountain components include a box with small balls inside that filter and circulate water, a blue and black filter cover, a 40W water pump (with cable connected and cover fastened), a pressure-fitted control valve and T-type system, an extension pipe for raising the fountain, and three different styles of nozzles (single fountain, sprinkler with adjustable water flow, and double-sided sprinkler). In addition, there are bags for filtering large particles.
Digging tools: Tools such as shovels for digging holes in the pond.
Building materials: Wood piles, wooden boards, and other materials used to build a platform to raise the waterfall.
Decoration materials: Decorative items such as stones and pebbles purchased from Home Depot.
Testing supplies: Battery pack (for testing water pumps if there is no solar panel).
Equipment Testing

Before officially starting the renovation, put the water pump into the paddling pool for testing. Make sure the water pump can absorb water normally and smoothly deliver water to the waterfall and fountain. At the same time, test different types of nozzles in turn to observe their water flow effects. For example, "Tech TRX" found in the test that the nozzle of a small sprinkler can be adjusted to change the width of the water flow, which can bring more interesting water spraying effects. Through comprehensive testing, possible equipment failures can be found in time to avoid discovering problems after the subsequent installation is completed, saving time and energy.
Digging the Pond
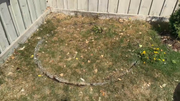
- Determine the scope: Turn the paddling pool upside down in the selected backyard location and spray markers along the edge of the paddling pool to accurately determine the scope of the excavation.
- Dig depth: Use a shovel to dig a hole about one foot deep. This depth can not only ensure that the paddling pool can be firmly buried underground later, but also meet the needs of pond water storage and landscape effects.
- Pipe laying: After the hole is dug, carefully bury the main unit's pipes underground next to the paddling pool. Ensure the accurate position of the pipes to prepare for the subsequent installation of the waterfall components so that the waterfall components can be placed steadily in the predetermined position.
- Nozzle positioning: Place the fountain nozzle in the middle of the paddling pool to complete the initial construction of the entire pond foundation layout.
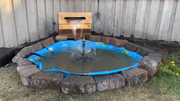
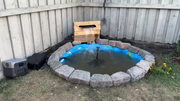
Enhance the Waterfall Effect
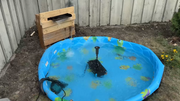
- Platform construction: If you want the waterfall effect to be more significant, you can nail a few wooden stakes in the ground as support. Then, place the wooden planks on the stakes to build a small platform. This platform is used to place the waterfall blades, raise the waterfall position, and enhance the visual effect of the water flow.
- Process testing: During the platform construction process, the waterfall and fountain equipment need to be tested again. Ensure that after adding platforms and other changes, the equipment can still operate normally and the water flows smoothly to avoid subsequent rework.
- Aesthetic treatment: After the construction is completed, the middle part of the platform can be covered and modified with wood. This not only makes the overall pond look more beautiful and natural, but also plays a certain protective and stabilizing role.
Power Connection
- Conventional power: The pump requires 120 volts of AC power for normal operation. If you choose to use conventional power, make sure the power outlet is secure and easy to connect to, and avoid cluttered wires or safety hazards.
- Solar power: If you want to be environmentally friendly or don't want to be bound by wires, you can purchase a suitable solar panel separately. The solar panel can convert solar energy into electricity, which can continuously power the pump and allow the pond to operate autonomously on solar power. However, it is necessary to confirm in advance that the power of the solar panel matches the pump and that the installation location can fully receive sunlight. In this renovation, since there were no solar panels at the time, "Tech TRX" used a battery pack for temporary testing to verify the operation of the equipment under power supply.
Decorate the Pond
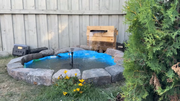
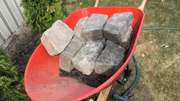
- Perimeter Decor: Use rocks purchased from Home Depot to place around the perimeter of the pond. These rocks are affordable at around $6 each. Placing the rocks in an orderly manner around the edge of the pond not only adds stability to the pond, but also greatly enhances its appearance and creates a natural atmosphere.
- Interior Decor: Sprinkle an even layer of pebbles and stones around the inside of the pond. Not only does this make the pond look deeper, as if it is deeper, it also provides shelter and shelter for any aquatic life that may be kept inside the pond, while helping to keep the water clean.
🎉 Enjoy Your Beautiful Waterfall Pond!