Materials Needed
Before starting construction, prepare the following materials:


Solar pump
Choose the Poposoap brand, which is high quality and comes with a battery pack. It can run on solar energy during the day and be powered by the battery pack at night or on cloudy days. This water pump can pump 430 gallons of water per hour, with a maximum head of 8.5 feet, and the power can be adjusted.

Safety equipment: Ensure the safety of the production process.
Concrete mixing barrel: Serves as the water storage base of the waterscape.
Cutting board: Used to cover the top of the mixing barrel and needs to be cut according to the size of the barrel mouth.
Drill bit: Used to drill holes in the cutting board and the bottom of the flower pot.
Copper pipe: Directs water flow.
Plastic and metal mesh: Protection and decoration.
Flower box: Adds a natural atmosphere.
Cinder block: Two 6×8×8 cinder blocks are used to fix the equipment.
Sealing material: Such as silicone to prevent water leakage.
Water pipe: Connect the water pump with other components.
Cable tie: Fix the water pipe.
1. Measuring and Cutting the Cutting Board
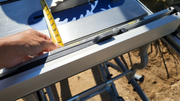

- Carefully measure the size of the opening at the top of the concrete mixing drum.
- Take the cutting board to the table saw and cut it to the measurements so that the cutting board fits snugly over the top of the mixing drum.
- Test the fit of the cutting board against the top of the mixing drum to ensure it is a tight fit.
2. Drilling


- Use a suitable drill bit to drill a hole in the center of the cutting board, and the hole size should match the copper tube.
- Make sure the drilling direction is correct, and then drill the same hole in the bottom of the flower pot.
- Test whether the copper tube can pass through the holes in the cutting board and the bottom of the flower pot smoothly.
3. Place the mixing bucket and cinder blocks


- Carefully place the concrete mixing bucket into the pre-dug hole, adjust the position so that it is level, and press it firmly with your feet.
- Put two cinder blocks in the mixing bucket and place them side by side, leaving space for the water pump in the middle.
4. Concrete and seal

- Pour a small amount of concrete around the mixing drum to prevent weeds from growing when water overflows and to make the water feature more stable.
- Apply a sealant (such as silicone) to the area where the cutting board will be placed to create a good seal to prevent water leakage. Keep squeezing it while applying so that it is evenly distributed in the gaps, and smooth out any excess sealant with your fingers.
5. Install the pump and battery pack


- Place the Poposoap pump between the cinder blocks.
- Connect the water hose and secure it with a zip tie to prevent it from falling off.
- Complete the circuit connection of the whole device by connecting the battery pack to the solar panel.
6. Prevent mosquitoes from entering

Cover the top of the water feature with a plastic or metal mesh to prevent mosquitoes from entering without affecting the beauty of the water feature.
7. Debugging and Adjustment


- Check the entire installation to ensure that the water pipes are in the right position and that the water can flow smoothly from the copper pipes, overflow over the cutting board and drip around.
- If the installation is not level, make fine adjustments to make the water feature reach the best condition.
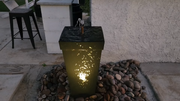
🎉 Enjoy Your Beautiful DIY Solar Fountain!
Tips

- Strictly follow safety regulations during operation and pay attention to safety when using tools.
- Measurement and cutting should be precise to ensure the installation fit of each component.
- When installing the battery pack and connecting the circuit, ensure that the connection is firm to avoid problems such as short circuits.
- When debugging the waterscape, pay attention to the water flow and make timely adjustments if there is any abnormality.