Imagine yourself stepping into your backyard, with the soothing ripple of water and gentle dance of aquatic plants greeting you. Instead of the usual hustle and bustle, you find a little pocket of peace right outside your door. A DIY pond can transform any outdoor space into a tranquil retreat. Not only will it provide a beautiful focal point, but it will also attract all types of welcome wildlife, including fish, frogs, and dragonflies. If you are ready to build an oasis that reflects your style-and reconnects you with nature-read on for an in-depth look at how to build your very own DIY pond.
Why Build a DIY Pond?
A DIY pond can be more than just for mere aesthetics. It's one great way to invite nature into your backyard while creating a place to relax after a hectic day. Ponds can help with water conservation, especially if you use collected rainwater. They also offer habitat for local wildlife, from birds looking for a quick drink to pollinators seeking a haven. If you are into gardening, a DIY pond can complement your landscape design and give you an excuse to experiment with aquatic plants you might otherwise not explore. Whether you envision a small container pond on the patio or a full-sized water garden complete with fish and a fountain, a DIY approach lets you tailor every aspect to your preferences, budget, and available space.
Plan Your Pond

1. Set Your Objectives
The moment of truth begins before you commence digging, taking into consideration the needs and expectations that you hold regarding this pond. Is this a fish-raising pond, with attention centered on water plants? Maybe just a small decoration in your place, with a soothing sound of water? Clearing your vision will help such decisions like size, shape, and depth guide your way easily.
2. Location, Location, Location
The placement of the pond itself can either make or break the success of your backyard oasis. Generally speaking, a spot that receives about six hours of sunlight is generally ideal, as it supports plant growth without overheating the water. Also, be very aware of overhanging trees—while shade can help keep water temperatures stable, falling leaves may create extra work by clogging your pump and filter. Think about visibility and access: you’ll want to enjoy the pond from your favorite sitting area, and you’ll also need to reach it easily for routine maintenance.
3. Regulations and Utility Checks
Do your homework on any local ordinances or regulations regarding digging and water features. If you live in a neighborhood with an HOA, confirm a pond is allowable. Most importantly, call your local utility company to ensure you won't hit any hidden cables or pipes when you dig. Being proactive can help you avoid fines and even potentially dangerous accidents.
Gather Materials and Tools
Having all the right materials at hand makes building your DIY pond smooth and enjoyable. Here's a quick checklist:
· Pond Liner: The flexible or premade liner that actually holds the water in.
· Underlayment: Fabric or other protective material used to cushion the liner from rocks and roots.
· Pump and Filter: Keeps water circulating, clear of debris-absolutely essential for a healthy pond.
· Rocks and Gravel: These can be large stones that can form a natural shore, while gravel lines the bottom and supports plants.
· Aquatic Plants: For oxygenation, shade, and aesthetic appeal. Think submerged plants like hornwort, floating lilies, and marginal plants like cattails.
· Dechlorinated Water or Rainwater: Filling your pond with chemical-free water gives your aquatic life a strong start.
· Shovel and Basic Tools: The spirit level, utility knife, hose, and bucket will also be useful from time to time.
How to Build Your DIY Pond
1. Outline the Pond's Area and Dig

Outline your pond with rope, spray paint, or even a hose. Once you like the shape, start digging. You'll want some areas deeper than others if you'll have several varieties of plants or fish that like to retreat to deeper water. The shape can be as organic or geometric as you like; it's up to you.
2. Underlayment Installation with Liner

After digging, clear the bottom of sharp stones or roots that could puncture your liner. Lay down the underlayment for added protection, then carefully spread the liner over the entire pond, fitting well into corners and contours. Secure the liner around the edges with stones or bricks.
3. Add Rocks and Gravel

Line with larger rocks, creating a natural shoreline, and if so desired, set in such a way as to offer wildlife an easy in and out climb. Lay gravel across the bottom to support the rooting of aquatic plants, space for colonization by beneficial bacteria, and helps to stabilize the liner from shifting.
4. Pump and Filtration Installation

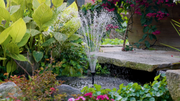
Position the pump and filtration as ordered by the manufacturer. Set up your pump and filtration so it sits where its design will maximize the water current within your homemade pond. With good aeration, algae production will be considerably less, which will reduce chances of mosquitoes infesting the said water. Consider setting up equipment for a very small waterfall or fountain now.
5. Fill the Pond
Use dechlorinated water or collected rainwater to fill your pond, if possible. If you are using tap water, you'll need to use a water conditioner to remove harsh chemicals. Turn on the pump and monitor the water level closely, smoothing any wrinkles in the liner as the pond fills.
Adding Aquatic Plants

Aquatic plants are crucial to a well-established DIY pond. They stabilize the ecosystem, produce oxygen, filtration out impurities, and protect fish or other creatures from being in direct sunlight.
· Floating Plants: Water lilies, duckweed, and water lettuce provide shade while adding beauty by consuming excess nutrients.
· Submerged Plants: Types of plants like anacharis and hornwort keep the water oxygenated and help keep algae in check.
· Marginal Plants: Cattails, irises, and rushes grow at the edges of the pond, merging your new water feature into the surrounding landscape.
To position plants, set them in pots or planting baskets filled with aquatic soil then weight them down with rocks or gravel. Position submerged plants in deeper areas and floaters on the surface.
Adding Fish and Wildlife
If you’re interested in adding fish, start with hardy species that adapt well to backyard ponds:
· Goldfish: Ideal for beginners due to their resilience and relatively low maintenance.
· Koi: Beautiful but require larger ponds and efficient filtration systems.
· Mosquito Fish: Great for controlling mosquito larvae and suitable for smaller ponds.
Acclimate the new fish in the pond water by simply allowing the bag to float for 15–20 minutes to equalize the temperature. This can reduce stress and shock.
Apart from fish, a well-designed homemade pond naturally attracts frogs, dragonflies, and birds as well. Leave a few shallow spots or half-submerged rocks so that these animals can easily sit or change locations. Do not use harmful chemicals, for they damage not only the ecosystem of your pond but also the wildlife that visit it.
How to Maintain Your DIY Pond
Regular maintenance will keep your DIY pond breathtaking throughout the year. Clear fallen leaves so that decaying doesn't throw off the balance of the pond. Periodically prune plants and take out the algae once it starts taking over. Check on your pump and filtration to make sure they are working correctly-replace or rinse filtration media as necessary, and keep the water flowing. In colder climates, you will need a pond heater or de-icer during winter to maintain an area of the pond's surface open to gas exchange.
Remember, in moderation. Cleaning too much and using too much chemicals will harm the balance rather than help. You don't want to remove the very process that keeps your pond healthy in the first place. A balanced approach will enable your pond to remain a self-sustaining ecosystem with minimum interference.
Enjoying Your Backyard Oasis
Nothing speaks to the beauty of your rewards than sitting at your new DIY pond with a cup of coffee or tea and listening to the gentle splashes of water, watching fish dart among the plants. Take pride in the fact that you created a tranquil retreat that brings you closer to nature while enhancing your outdoor space. A well-constructed DIY pond is more than just aesthetics or ambiance; it's a living water feature that supports a thriving community of plants and animals.
The most talked-about spot, this pond is bound to be the moment friends and family visit-from creative decisions made in its design to the fascinating critters now calling it home. This do-it-yourself pond project is one that will inspire others to take a little slice of nature right into their own backyard. Take in the serenity and relish the glory of your labor, turning simple grassy lawns into an alive and kicking water body of art.

In the process of building an eco-pond, there are five indispensable elements that work together to create a vibra...

Today, I will share with you a super creative DIY project - a homemade solar water feature that runs day and night...

Here, we will cover the therapeutic benefits of the running water from the fountain, how it contributes to t...

Are you eager to add a touch of lively scenery to your backyard or terrace? The gurgling water and the sparkling w...

When creating a courtyard landscape, a pond is often an element that can add natural charm and agility. And if you...

In rural life, the sun always pours generously, providing unlimited possibilities for various creative projects. T...