Materials Needed
Before starting construction, prepare the following materials:
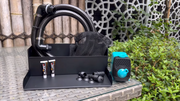
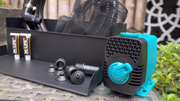
- POPOSOAP pond waterfall kit (including 40W water pump, 9.8-foot hose with sealing accessories, two tubes of silicone adhesive, waterfall spillway and other components)
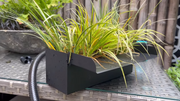
- Pond box (placed in the appropriate location in advance)
- Aquatic plants (optional, used for biological filtration and improving water quality)
- Cleaning tools (used to clean the installation location)
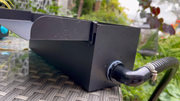
1. Apply silicone adhesive
Open the silicone adhesive and apply it evenly around the inner edge of the spillway. When applying, pay attention to the moderate thickness to avoid excessive overflow and affect the appearance, and too little will not achieve the sealing effect.
2. Connect the hose to the water pump
Connect one end of the 9.8-foot hose tightly to the 40W water pump to ensure that it is firmly fixed to prevent water leakage. Since the fixing device on the hose has been pre-installed, just align the interface and tighten it.
3. Connect the hose to the waterfall spillway
Screw the other end of the hose into the corresponding interface of the waterfall spillway, and also ensure that the connection is tight and watertight.
4. Place the Waterfall Kit

Carefully place the spillway with adhesive applied into the pond box and adjust it to the appropriate position to ensure that the spillway is placed stably and will not shake. Wait for the silicone adhesive to cure. Do not move the spillway during this period.
Slowly place the water pump connected to the hose into the pond water. The placement of the water pump should ensure that it can pump water normally without affecting the overall appearance of the pond.
After confirming that all connections are correct, plug the water pump into the power socket. At this time, the water pump starts working and the water flows through the hose into the spillway, forming a waterfall landscape.
🎉 Enjoy Your Beautiful Waterfall Pond!